In our previous articles Five reasons why your school should use YouTube and Can’t I just post my videos on Facebook or Instagram (Instead of YouTube)?, we showed how video can help you keep customers and generate new business at your studio. If you’re persuaded but not sure where to start or how, here’s a brief primer on how to get a YouTube channel, shoot the video and upload/tag your school’s videos.
Step 1: Shoot the video

When creating the content for your YouTube channel, use a digital camera, such as your mobile phone’s video recording capabilities or, for a better quality appearance, consider using a digital camcorder.
Here are ideas on what to record:
- Class sessions
- Recitals
- Meets/Competitions
- Special events, such as holiday performances or open house events
- Instructor introduction videos
- School tours/walkthroughs
- Parent or student testimonials about why they like your class-based business.
Step 2: Prep the video
After you shoot the video, it’s possible that your video is good enough that it’s ready to transfer to YouTube. In most cases though, you may want to “clean up” the video, or improve it, by using a video editing tool to remove extraneous footage, to tighten it up, or to add transitions between shots (fade in from black, fade out, dissolve between shots, or add titles or branding).
There are many products for this optional editing stage, from free to thousands of dollars. For a school’s marketing purposes, low-cost or free options are likely sufficient — and may already be included with your computer’s system software. Or, do an online search for “free video editing software” for Mac or for PC, and you’ll find many user-friendly tools to choose from.
Step 3: Create a YouTube channel
To upload your video onto YouTube, you must first create a Google account (because Google owns YouTube), and then you can use your Google account profile to create your YouTube channel. After you’ve completed the creation of your Google account, follow these three steps to get started with YouTube:
- Create a YouTube profile, so YouTube knows who you are. Do a search for how to create a YouTube account, and you’ll find a few video walk-throughs, or view this step-by-step guide.
- Assuming you’ll want to post more than one video, it’s a good idea to create a YouTube channel. Go to YouTube’s Create a Channel screen, or check out this video that shows you visually how to set one up.
- Once you have set up your YouTube channel, you can either go ahead and start uploading videos to your channel, or you can first customize your channel by adding introductory images and info to “brand” your channel so that it is clearly about your school and links back to your school’s web page.
Using channel customization features, you can optionally add:
- Your school’s logo
- A custom “banner” to showcase your school’s theme or look and feel
- Links to your school’s web page
- Links to your school’s social media pages
See the ClassJuggler YouTube channel for an example of this customization.
Step 4: Upload your video to YouTube
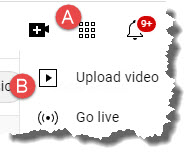
Uploading your video to YouTube is super easy. Once you’re logged in to your channel, you’ll see a Create button (see A below). Click on it, and it will reveal two more buttons, including the one you want: Upload video (B below).

After clicking on the Upload video button, locate the video file on your computer or phone, and upload.
While your video is uploading to YouTube, you can add file-specific information, which will help people find your YouTube channel and this specific video based on matching search terms. Give it a title and description, which helps those who locate your video to know what it’s about.
Also take advantage of YouTube’s Tags (which can help someone searching YouTube to find the video), and Visibility settings, which define who can or cannot see the video. For marketing purposes, you’ll want to set visibility to Public, which means that anyone can find it.
Step 5: Notify your customers!
Once the video is uploaded fully, YouTube provides you with a unique web address for the video, which you can now use to promote your video to your current and prospective customers. Three ways to do this:
- Use ClassJuggler’s built-in e-mail tools to tell your students/parents about the freshly uploaded video. You can choose to send it to just those in a particular class, or send it to your whole customer base.
- Advertise your YouTube channel on your website. Not only can you add it to your list of social media sites (see the top of our pages for an example of this), but you can advertise a class-specific video link with your class description, or add a “See our facilities” video link on your Contact Us page.
- Use your other social media sites (such as Twitter or Facebook) to announce each new video you upload.
Also, regularly encourage others to subscribe to your YouTube channel. Subscribers are notified by YouTube any time you upload a new video. You can encourage subscription on your site, in social media posts, in your newsletter, and in your e-mail signature line.
If a picture is worth a thousand words, then a motion picture — video — magnifies that by a few million words. Why preach with words about what your school is like when a video can show them?